Installation guide for NLPI
This guide covers the installation process basically on WinNT 4.0.
It has been tried (with a half-success) on windows 95. Please
read the
Known Windows 95 issues document.
Because of lack of other operating systems I cannot provide support
for them.
Note: For Version 0.07 I have included all the binaries
and libraries to simplify the installation.
I as the copyright holder of NLPI should assure therefore explicitely
that the GPL does not extend to the included files which you can
download seperately here; they belong to their creators.
This installaton is very time consuming and can be annoying if you
make any mistakes. So please take your time, too. Your computer will
take his time anyway.
Copyright of the guide by Toni Arnold, 2000-2001
License of anything written by me here: GNU GPL-2 (
www.gnu.org)
Install Zope
Go to the Zope homepage
or their Products page,
go to "Download Zope *" and download the *-win32-* installer (5.3 MB).
This instructions were written for Zope Version 2.4.3.
Install the Zope Application
- To install run the downloaded Zope-2.4.3-win32-x86.exe (or newer) installer.
NT4.0: Don't run Zope as a service. You gain nothing for the offline-use here but you loose any internal error messages from Zope and the possibility to run Z-code in the DOS command window.
- Use a standard installation named "WebSite" or anything you like. The name you use
will be the folder name which will be installed in "C:\Program Files\" (as long as you don't browse to another location).
- As long as you use Zope only on an isolated PC you can choose an easy-to-remember
account.
Security: If your computer resides in a network (even if it is "only" connected to the internet) anybody can log in into your running Zope installation by "http://your.ip.address:8080"! In this case it is important to use secure (which means cryptic "hard to guess") passwords!
- Zope will take its time for "Compiling python modules".
- Now I recommend first to install the NLPI mix-in class
because it is compiled when Zope is started.
- To start Zope go to the Zope installation directory (e.g. "C:\Program Files\WebSite\").
Double-click on the file "start.bat". This will run Zope in a command shell.
By the way: I recommend to create a shortcut to this file on your desktop or
in the Start menu for easy access to Zope.
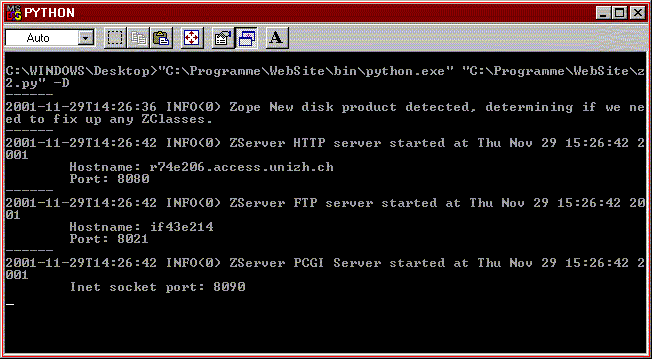
The first Zope startup will take minutes.
In case of success you should see the following window:
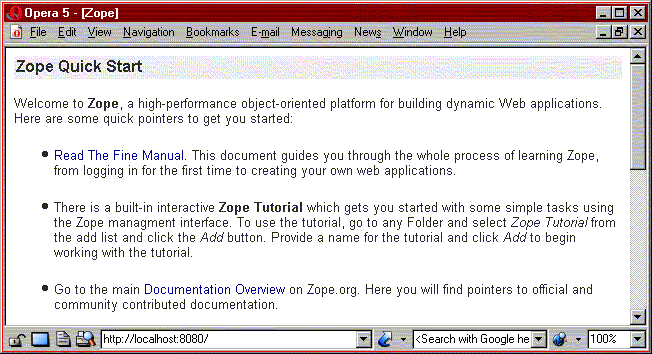
- Now you should be able to access Zope on the url
http://localhost:8080.
In case of success you should see the following window:
- In case of success after a long download through an expensive
modem internet connection have a break and drink some tea. If you live in
an ethernet network you can jump directly to the
Install the NLPIProduct ZClass section.
Install the NLPI mix-in class
This is the file called
NLPIaux.tar.gz.
After downloading it unpack it to your Zope installation directory
(e.g. "C:\Program Files\WebSite\"). With WinZip this works as follows:
- Double-click on the file, click "Yes" to
open it. You should see now a file list with some *.py files.
- Click "Extract".
- As destination directory choose your Zope installation directory (e.g. the "WebSite" folder).
- Now there should be a folder "NLPIaux" with some subfolders and the Python source files
deep inside your Zope installation (e.g. "C:\Programme\WebSite\lib\python\Products\NLPIaux").
- This source files will be compiled next time you start Zope.
Install the NLPIProduct ZClass
Until now you have only installed half of NLPI. The
NLPIProduct ZClass named "NLPIProduct.xml"
has to be imported into Zope. To
import the file download it - and don't ask me why you'll have
to right-click on it in many browsers to download it instead
of pseudo-viewing it, even if it is g-zipped -
and extract it to the "import" directory of your
Zope installation (e.g. "C:\Programme\WebSite\import").
"Go directly to the Zope Management Interface" (the links
is located at the end of the zope screen). You will have
to log in with your account created while installing Zope.
Then click on
"Control_Panel (Control Panel)". You can browse through the
Zope object hierarchy like through a file hierarchy in the
windows explorer by using the left frame.
By the way: Here you see the "Shutdown" button to properly exit
Zope. In my experience it is ok to close the "PYTHON" windows
command window instead (but wait until you are sure that Zope
is not working anymore; if it crashes it can leave a damaged
HD filesystem behind it.
Click the "Product Management" button or, alternatively, click on
"Products" in the left frame. This should bring you to the Products screen.
If you have installed the NLPI mix-in class correctly,
it should appear as "NLPIaux (Installed product NLPIaux (0.07))"
in the product list as below:

Now click the "Import/Export" tab on top of the right frame.
Scroll to the bottom of the screen and enter
NLPIProduct.xml in the "Import file name" field
as below. Click the "Import" button.
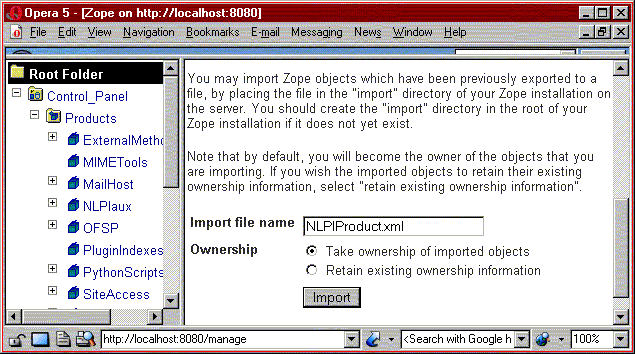
After some time there should appear a message
"NLPIProduct sucessfully imported".
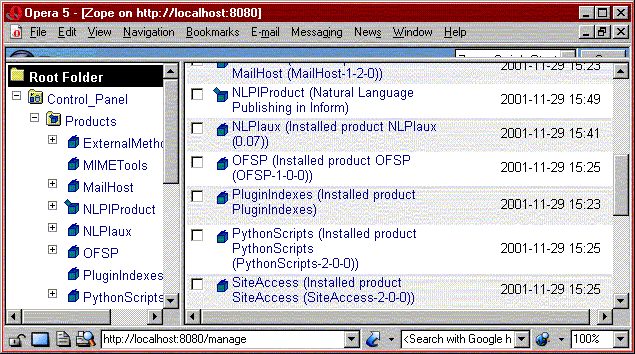
The "NLPIProduct (Natural Language Publishing in Inform) "
should now appear in the Products list. To update also the left frame,
press the "Refresh" link at the bottom. If anything is ok it should
look like that:
Important Note
If the left frame is not updated (you see only NLPIaux, but not
NLPIProduct) you have the well known "Zope cache problem".
You must set your browser preferences such that any documents
are always checked whether they were changed before they
are fetched from the cache. Otherwise you will sometimes see
no reactions to your actions from Zope.
In Opera 5.x this is found in the "Preferences -> History and cache"
dialog down under "Check modified". In other browsers this should
be similar.
To check whether NLPI really is installed now, go to the root folder
by clicking it (this is the lonely folder just on the
top in the left window). I recommend first to create a Zope folder
which acts just like a folder in your file system.
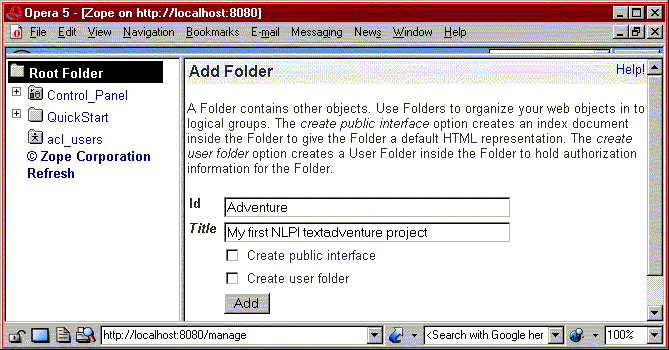
In the selection list left of the "Add" button select "Folder".
If you have javascript enabled, you will directly be leaded to
the "Add Folder" dialog. Enter an id (e.g. "Adventure"). The
title is just for optical reasons. Leave the two checkboxes unchecked
and press "Add".
Because items are sorted alphabetically your Adventure folder
comes on the top of the item list. Click on it (it doesn't matter
whether you click in the left or in the right frame). You
are presented the "Contens" view (look at the tabs on top) of your folder.
URL of the new folder
You might be irritated by the other Zope-specific products and to be
left alone with your Adventure folder. Well, the url of it is:
http://localhost:8080/Adventure/manage -
the "manage" view of your Adventure folder.
Adding an NLPI instance
In the "Available Objects" selection list there should be now
- besides a lot of other object types - an entry called "NLPI".
If this entry is missing something has gone wrong on importing
NLPIProduct.xml.
Selecting "NLPI" leads you - just like if you had created a folder again -
to the "Add NLPI" dialog. There are two fields: an "Id" field
and an "ICL file" field.
Enter the full path to an inform ICL file of an existing
project of yours or install the
Adventure example.
Note: It is important that you edit
the ICL file and change +source_path
and+code_path to the folder where the ICL
file is located.
Enter the full path to the file
Advent.icl with "Browse" and then copy-pasting
the path.
If this sounds inconvenient to you, you might want to install the
"Send to x" utility.
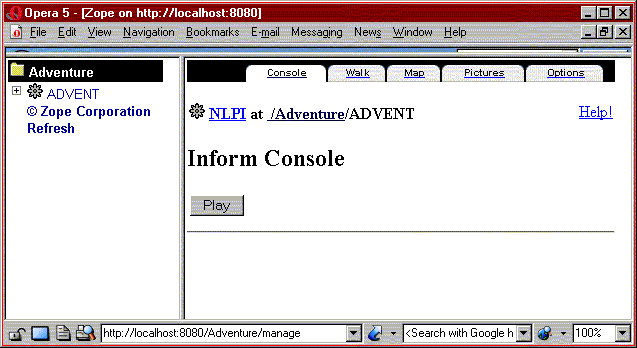
Enter e.g. "ADVENT" as Id and press "Add".
If everything is ok you should directly see the new item of type "NLPI"
whith the approriate icon " ".
".
Tip
If you think that you have done something completely wrong,
the easiest way to undo your actions is to select the "Undo" tab
on the top, to check the actions you want to undo and then to
press the "Undo" button - a feature brought to you by Zope.
Play
Well, press the 'Play' button. After a while a WinFrotz pops up
and you can play the classic adventure.
Windows 95/98 issue
You must hack your Zope installation to make NLPI work
on win 95/98. If you get an exception that Python doesn't find
w9xpopen.exe, go to the \bin\lib\win32 directory and
copy win32popenWin9x.exe to above name. Eventually you must
move it to the \bin\ directory or even the Zope root
directory.
Congratulations! You have done it!
Have a break and drink some tea (now even if you have a fast
internet connecton ;-) ...
Download the Adventure example
This
Adventure is a copy of the original available e.g. at
ftp.gmd.de, but split into several sources in different folders and
with an additional inform ICL file. Extract it in any personal folder
of yours.
Install an inform and/or glulx compiler
Probably you have already an inform compiler on your system.
NLPI works with two compilers: the original by Graham Nelson
and the bi-platform compiler by Zarf.
You can install both of them and choose in the NLPI preferences
which to use.
You can download the
original inform compiler
from the /executables/-directory of
ftp://ftp.gmd.de/if-archive/infocom/compilers/inform6.
Its homepage is located at
http://www.gnelson.demon.co.uk/inform.html.
With this you are "only"
able to produce z-code-only story files.
The
bi-platform-compiler can be optained from Zarf's
glulx inform page
or at the if-archive in the directory
ftp://ftp.gmd.de/if-archive/programming/glulx/.
Extract the binary executables
into the \lib\bin\-directory of your installation, e.g.
C:\Program Files\WebSite\lib\python\Products\NLPIaux\lib\bin
Install the bi-platform library (needed for glulx)
You can use any library you want, but I recommend to install
and use the glulx-inform bi-platform library
libg610.tar.Z
from Zarf's
glulx inform page.
or at the if-archive in the directory
ftp://ftp.gmd.de/if-archive/programming/glulx/.
If you want to produce only z-code-files of course you can use
the original library
inform_library610.zip
available at the if-archive in the directory
ftp://ftp.gmd.de/if-archive/programming/inform6/library/.
Extract the inform libraries
into the \lib\inform-directory of your installation, e.g.
C:\Program Files\WebSite\lib\python\Products\NLPIaux\lib\inform
Install the infglk.h inform library
This is needed for the sensory_lib.h inform library which
gets installed by "Install the NLPI mix-in class"
into the \lib\inform-directory of your installation, e.g.
C:\Program Files\WebSite\lib\python\Products\NLPIaux\lib\inform
It was extracted and extended out of
sensory.inf from Zarf's
glulx inform page.
The inform library
infglk.h is also located at the
glulx inform page.
Install z-code and-or glulx interpreters (needed)
For viewing and playing z-code-files I recommend to download
and install DOS-Frotz
DosFrotz232Std10.zip from
ftp://ftp.gmd.de/if-archive/interpreters-infocom-zcode/frotz/.
For viewing and playing glulx or blorb files you need Glulxe
WinGlulxe-035.zip
from Zarf's
glulx inform page
or at the if-archive in the directory
ftp://ftp.gmd.de/if-archive/interpreters-other/glulx/.
Extract the binary executables
into the \lib\bin\-directory of your installation, e.g.
C:\Program Files\WebSite\lib\python\Products\NLPIaux\lib\bin
Install perlBlorb
This is the older alternative to iblorb.
It needs a perl interpreter.
Because perlBlorb is copyrighted by Graham Nelson, first download
the original script
perlBlorb.pl
from his
blorb page
and then either apply this
patch to it or
make the following replacements by hand.
These are really alpha-release hacks
and basically make perlBlorb.pl accessible by command line options,
suitable for glulx code files and
suitable for jpeg picture files if their filename ends with ".jpg".
If you have patched perlBlorb, place it in the \lib\perl\-directory
of your installation, e.g.
C:\Program Files\WebSite\lib\python\Products\NLPIaux\lib\perl
Hand patch file
----- line 10 ff ------------------------------------------
$temp_prefix     = 'ram:';   # Prefix for location of temporary directory
$file_sep        = '.';      # Character used to separate directories in
                             # pathnames (on most systems this will be /)

$blurb_filename  = '$.Adventure.Blorb.BLURB';
$output_filename = '>$.Adventure.Blorb.blorbfile';
-----------------------------------------------------------

by

----- line 10 ff ------------------------------------------
$temp_prefix     = $ARGV[0]; # Prefix for location of temporary directory
$file_sep        = '/';      # Character used to separate directories in
                             # pathnames (on most systems this will be /)

$blurb_filename  = $temp_prefix.$file_sep.$ARGV[1];
$output_filename = '>'.$temp_prefix.$file_sep.$ARGV[2];

$storyfile_type = "GLUL"; 	# or"ZCOD";
-----------------------------------------------------------


----- line 587 ff -----------------------------------------
    if ($type eq "Pict")
    {   $type = "PNG ";
-----------------------------------------------------------

by

----- line 587 ff -----------------------------------------
    if ($type eq "Pict")
    {   # $type = #"PNG ";
        if ($chunk_filename_array[$x] =~ /.+jpg$/i) {$type = "JPEG"};
	if ($chunk_filename_array[$x] =~ /.+png$/i) {$type = "PNG "};
-----------------------------------------------------------


----- line 607 ff -----------------------------------------
    if ($type eq "Exec")
    {   $type = "ZCOD";
-----------------------------------------------------------

by

----- line 609 ff -----------------------------------------
    if ($type eq "Exec")
    {   $type = $storyfile_type; # before it was only "ZCOD"
-----------------------------------------------------------
Install Perl
Either you go to the (huge, >8MB) actual
Activestate
distribution (an .msi-installer file) or (if the link still works) an obsolete
(but basically working) smaller
win32 distribution (<6MB) on
www.perl.com. For finding a mirror server use the
CPAN multiplexer.
This are the installation instructions:
perl5.00402-bindist04-bc.readme. The process is as follows:
- Unpack the distribution in a temporary directory
- Run the "install.bat"-file
- Type <Return> to install it on C:\perl
- Type <Return> to create the directory
- Type <n> + <Return> as long as you don't use a c compiler
- Type <n> + <Return> if you don't want perl documentation (not needed for NLPI)
- Type <Return> to proceed
- The PATH manipulation is not necessary if you just use it with NLPI (but
nevertheless recommended).
Installed this way it uses 10.9 MB of disk space.
Install iblorb
You can download the DOS-executable
iblorbb.zip from the blorb folder at
ftp://ftp.gmd.de/if-archive/programming/blorb/
or executables an sources directly from the
from the if page
of its writer, L. Ross Raszewski.
For DOS it is here,
and for Linux there is some
elf binary there.
If you are not working with an unix-clone,
you will have to download the
c-sources and to compile them for yourself.
Extract the binary executables
into the \lib\bin\-directory of your installation, e.g.
C:\Program Files\WebSite\lib\python\Products\NLPIaux\lib\bin
Install Microsoft's "Send to x" utility
In a web browser environment files have to be given
by their complete path and name. Because always typing
this by hand is inconvenient microsoft provides an utility
named
"Send to X". Because they always change their URLs
it migth be necessary to go to the
microsoft homepage
and search for "Send to X 1.2" or just "Send to X".
If that doesn't work no more, try "PowerToys".
Caveat: Microsoft claims that it doesn't work on win98.
I only know that it works on win95 and NT4.0.
To install run the w95sendtox.exe - it is just an expander which will create a
"Sendtox.inf" file. By right-clicking on it you can install it with
the "Install" menu entry. To finish installation you will have to manually
close the help window.
Copyright 2000, 2001 by Toni Arnold, Zürich
This is part of the NLPI product by Toni Arnold,
distributed under the GNU General Public License GPL-2
Last update: November 27, 2001


 ".
".
